
Introduction to the visual editor
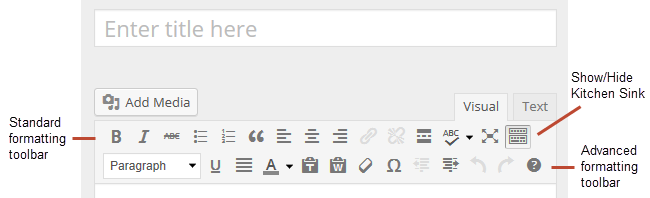
The area where you write your post is by default in Visual Editing mode which uses WYSIWYG (What You See Is What You Get) option for formating.
It works similar to any Word processing software.
Simply write your post, highlight any text you want to format and then click the appropriate button in the toolbar to add formatting such as bold, italics, number list.
The Show/Hide Kitchen Sink button is used to view the advanced formating options including heading styles, underlining, font color, custom characters, undo, redo.
You switch between Visual Editing mode and HTML editing mode by clicking on the Visual or Text tab.
Tips for writing better blog posts
Reading online is different from reading in a text book.
The easier to read and more engaging your posts are the more likely they’ll be read and the better your message will be conveyed.
Here’s some tips to help you write better posts on class blogs:
Back to Top
1. Use short paragraphs
Posts with really long paragraphs are harder to read online.
Best options are:
- Break your posts up with paragraphs.
- The more paragraphs the better.
- Short paragraphs are better than long.
- If you need to make some paragraphs one or two sentences long so they are visually easier to read online then do it if needed!
- Make the first sentence of each paragraph make your readers want to read the rest of the paragraph.
Back to Top
2. Use Headings
Use headings, and where appropriate bullet points and number lists, to break up the post into manageable bit size chunks.
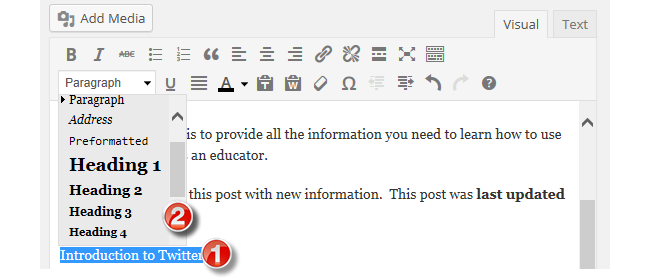
Creating a heading is as simple as:
- Highlight the text you want to change into a heading
- Select the Heading Style you want to apply from the advanced formatting toolbar (you access the advanced formatting toolbar by clicking on the Show/Hide Kitchen sink icon) – for most themes your best option is Heading 3
- Preview your post to make sure that headings you’ve used has broken your post into manageable chunks
Back to Top
3. Remember to Link
When you write about a website you should link to it as your readers often want to check it out in more detail.
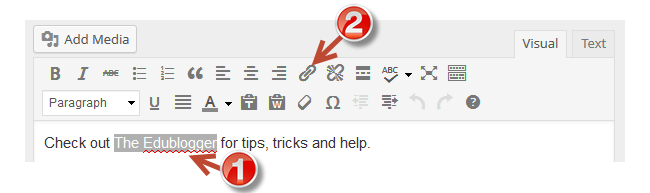
Creating a link is as simple as:
- Highlight the text you want to link to a website, blog or post
- Click on the Insert/Edit Link icon in the standard formatting toolbar
- Paste the link URL
- Then click Add Link
Back to Top
4. Using colored text
While you’re less likely to use colored text in posts on a personal / professional blog it can engage students and draw attention to specific information on posts on a class blog.
You’ll see examples of it used in posts on Miss Jordan’s Class blog and the Student Challenge blog.
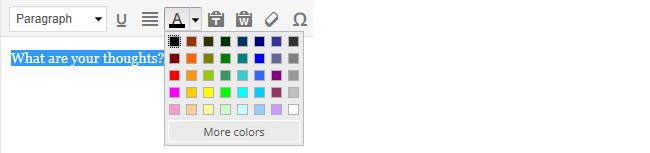
Changing the color of text is as simple as:
- Highlight the text you want to change
- Select the text color you want to apply from the advanced formatting toolbar (you access the advanced formatting toolbar by clicking on the Show/Hide Kitchen sink icon)
- Preview your post to make sure the text is readable and you like the color
Back to Top
5. Enhancing posts with images and media
When you look at class blog you’ll notice they enhance their posts with images and other types of media including videos and by embedding online tools.